Wednesday, April 11, 2007

What to do with used (but beautiful) Holiday cards?


Every year at Christmas we receive almost a hundred holiday cards from our friends and family around the country. Some of them are so beautiful, we didn't want to throw them away. As a way to display the old cards with new life, we used frames we had, which no longer had pictures in them, and placed in the new holiday cards. When Christmas rolled around, we replaced our regular frames with the Holiday Card frames for an inexpensive and seasonal lift. Framed Christmas Cards can brings the holiday cheer into a room, without overwhelming the decor. (Not that I am opposed to throwing tinsel everywhere and calling it a day :)

This idea can be used for any season, as we have featured a spring example here.

Contributer: mommy mc'crafter in the midwest:)

Tuesday, April 10, 2007

Second Life for Old Buttons


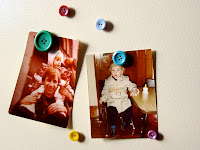
I had an old container of classic 1950' and 1960's assorted womens buttons. I loved all the colors and the sassy style of some of the women's suit jacket buttons. I thought it would be neat to be able to display them in a fun way.

I turned my cloth covered suit buttons into push pins for my bulletin board and my brightly colored blouse buttons into magnets. They are unexpected and easy!

Supplies needed:
  • Metal Thumb Tacks
  • Small Circle Craft Magnets
  • Glue Gun
  • Assorted Buttons
Click on the images to see larger.

Easter Egg Basket!


These baskets are adorable, sitting out on the table for the season! They are delicate and a pleasant change from the traditional handled baskets.

Directions are as follows: Take a balloon and blow up to desired size. Mix simple syrup – equal parts water and sugar. I used 2 cups of each. Heat in saucepan until clear. Remove from heat. Add crochet string of desired color to the simple syrup and use spoon to saturate the string. Tie string to balloon end and begin wrapping string around balloon, overlapping until well covered. Hang to dry (about 24 hours.) Be sure to put paper under balloon while it is drying, the syrup will drip. When dry pop the balloon. Decide what you want the bottom to be and push down on hard surface to make a flat spot. Take scissors and cut an oval for opening. Trim edge with ribbons, flowers, small toys, etc.

Monday, April 9, 2007

Easter Basket Cake

This is the best photo I could get from her, but one of my fellow "crafters" has the corner on cakes (You'll see more of her creations when I get her to hand over the photos!)

For Easter, she created this 2 layer white cake, complete with "grass and eggs" and a handle. The handle is not edible. Click the comments link below to see full project details!

Peep Topiary

Nothing says classy like a peep topiary! This creation comes from one of my 'aunt-crafters' who recently visited the Philadelphia Flower Show, and became inspired.

90 peeps were harmed in the creation of this topiary, I feel their death was well worth the sacrifice. How else could you get such a charming and tasty centerpiece!

The Craftiest Baby Shower Gift

I saw these diaper cakes online for $65, and thought "Wow, what an adorable shower gift. I bet I can reverse engineer that thing and create my own for half the price." 50 diapers and some floral foam later...walla! I had myself a diaper cake.

The trick in creating a diaper cake is that no diapers can actually be harmed in the construction of the cake. I don't think this gift would win any favors with mothers when they took it apart, placed a diaper on their baby, and promptly had the thing leak. As well as being functional, they make a great center piece for the baby shower. Click on the images for a larger view.

Free Furniture! Whoopie!


Now that I had created a headboard for our guest bedroom. on the ranch, I was on a hunt for furniture to fill the room. At our neighborhood annual garage sale, I struck gold! My neighbor offered up the piece pictured here for FREE! There was great debate as to whether I should be "refinishing" these pieces or "painting" them. Much to my fathers chagrin (who believes painting over any wood is a crime punishable by law) I went with painting. After all, I was looking to match the existing "door-headboard."

All the hardware came from Van Dyke Restoration. An incredible company with an extensive catalog of period relevant hardware and refinishing tools for any project. I went with 1940's milk glass drawer pulls. Post for specifics.

New Life to an Old Room


Back to the ranch...we inherited with the purchase of our home a 1970's dining room set. The site of which was so ugly, no one, would even bother to remove it from the house. Because we were poor (and would have no where else to sit, if we trashed it) we kept it.

It lasted about 2 years in it's original heinous state before I got my mc'crafter hands on it. After some careful conversation with my friends at the Benjamin Moore Paint Barn, and a visit to Frank the Upholsterer...I no longer eat dinner on the set of the 'Wonder Years'

I used to be a Door!


Three Years ago my Husband and I purchased a 51 Year old Rancher. The house was, by far, our biggest "craft" project. As we began to replace all of the old single panel wood doors with white, 6 panel doors, I began to think, "I could give at least one of the old doors a new life, as a headboard!!."

A couple pieces of crown molding, quarter-round and some high gloss
white paint and I had a new headboard, much to the amazement of my better half :) The final product is displayed here, post if you are interested in specific detail, or if you want to see what the original door looked like. (It was ugly, I promise)

Sunday, April 8, 2007

Easter Basket!

This Easter was my first attempt at live floral arrangement. I went with a pussy-willow-handle basket. As I plan my crafts always on late notice, I could not find any actual pussy-willow the day before Easter. The Basket Handle used here has been created from faux-willow The Small Pot contains 5 bunches of tulips.

It is a beautiful, but somewhat expensive (because of the tulip prices) centerpiece. Next year I will try and plan ahead to get a real pussy-willow handle. If you are interested in he details of the project please post below and I will post the step by step process f creating an Easter Tulip Basket.